
Tie-Dyeing Cotton Strips for a Quilt – Quick and Easy!
On my other site, Designs by Studio C, I wrote a post on Tie-Dying Fabric for a Bench Seat using Tulip One-Step Tie-Dye. The gracious folks at I Love to Create sent extra tie-dye to create other projects with the fabulous Tulip One-Step Tie-Dye! One of the other projects I’ve been wanting to create was a tie-dyed quilt, so let me share how to tie-dye fabric for a quilt!

Materials:
- 1/2 yard white 100% cotton quilting fabric for each color used (I used six!)
- Tulip One-Step Tie-Dye (<– affiliate link!)
- Plastic gloves
- Plastic garbage bags
- Rotary cutter and mat
- Sewing thread
- Quilt batting
- Fabric for the backing and binding
Step One
Start by washing and drying the fabric. This removes the sizing (a chemical used to keep the fabric crisp and wrinkle-free) and pre-shrinks the fabric.
If the fabric is in one continuous piece, cut separate pieces for each tie-dye color used, then run the fabric through the rinse and spin cycle in the washer. The fabric needs to be wet in order for the tie-dye to thoroughly penetrate it! (The photo came out really yellow! Sorry about that…)

Step Two
Spread the plastic garbage bags on the surface being used to dye the fabric. I use inexpensive garbage bags from the dollar store (reuse them by rinsing the dye off and hanging them to dry on a clothes line!), layering the bags. In other words, I am using six different colors of tie-dye so I layered six bags on the counter.
Scrunch up the fabric or tie rubber bands around it, then get ready to dye it! Add water to each bottle of Tulip One-Step Tie-Dye as indicated in the instructions and shake the bottle to mix the dye – while wearing gloves, of course!

Step Three
Thoroughly saturate the fabric with the dye then roll the dyed fabric in one of the garbage bags. The plastic keeps the fabric from drying out so that the dye has plenty of time to penetrate it. It will need to sit for six to eight hours – I like to leave it overnight.

Step Four
Rinse the fabric thoroughly to remove the excess dye, then run the dyed fabric piece through the rinse and spin cycle in the washer. Toss the piece in the dryer or line dry. Press as needed.


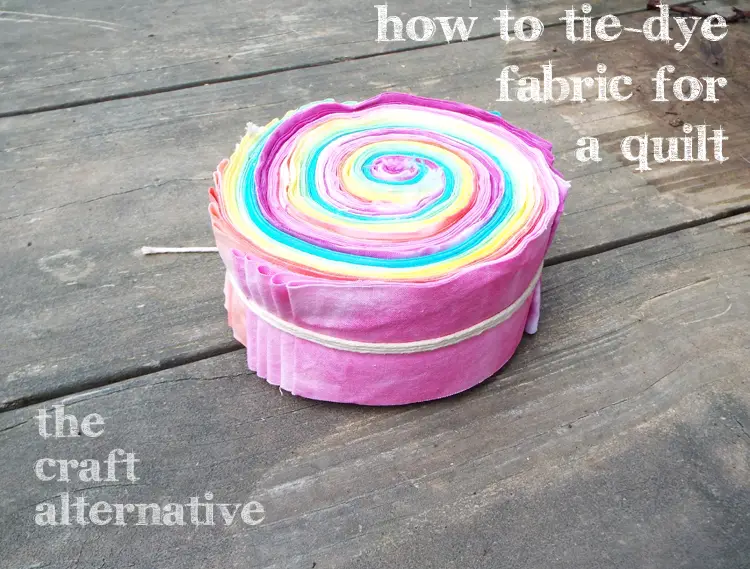
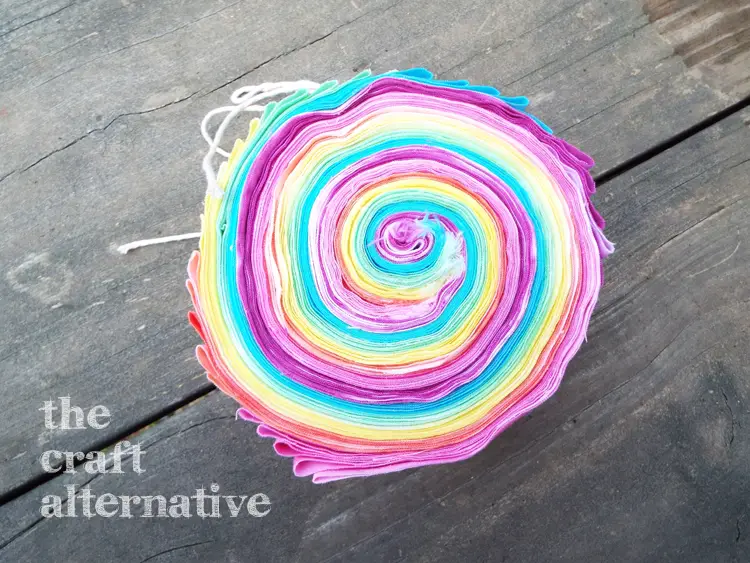
I cut the fabric into 2-1/2″ strips and arranged them into a “jelly roll”.

I found a really cute quilt pattern and I think I might use my newly tie-dyed fabric to create this cute quilt!

I love how saturated the Tulip One-Step Tie-Dye colors are and they stay true! I hope my little tutorial on how to tie-dye fabric for a quilt has inspired you to try Tulip One-Step Tie-Dye to create a masterpiece of your own!
Disclaimer:
I was not paid to write this post but I Love To Create did provide the Tulip One-Step Tie-Dye for me to use on a few projects. I really love this dye!
Sharing with:
Fluster Buster’s Creative Muster
Originally posted 2014-10-01 08:00:15.